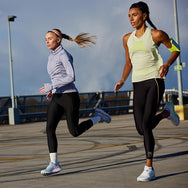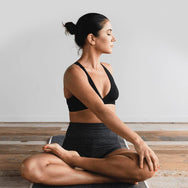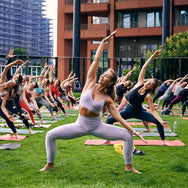


The new year is upon us but, sadly, we haven’t left the challenges of 2020 behind us yet. Coping with another lockdown, the new normal, and working from home is a trial. If you’re looking for a mental and physical boost, including yoga in your daily routine is one answer.
Whether you’re completely new to this practice or a fully-fledged yogi, there’s a pose that will suit your skills. To give you some inspiration, we spoke to two of our favourite yoga experts to get the inside scoop on the best yoga power poses to try at home.

GODDESS POSE
“One of my favourite postures for grounding and strength is Goddess Pose or Utkata Konasana,” says Molly Mckeever, owner at Sweaty Soul Studio where she hosts daily online yoga and meditation classes. “Goddess Pose asks us to get in touch with the divine feminine within ourselves, balancing our strength and power with deep inner wisdom.”
If you’re looking to tone your core and glutes, stretch out your hips, and strengthen your muscles, give this grounding and centring yoga pose a whirl. You don’t have to be a pro to get it right. Simply find a space to practice and follow Mckeever’s expert steps here:
Step 1: Begin in a comfortable standing posture with your feet hip-width and parallel at the top of your mat, take a big, open step with your right foot toward the back of your mat. Turn your toes out to a 45-degree angle.
Pro tip: Advanced practitioners can begin to bring the heels in line with the toes and the long edge of the mat.
Step 2: Bend your knees so they land directly over the ankles, sending the knees toward the second two toes of each foot. Drop the tailbone down and sink the hips while engaging the core. Lift up on the pelvic floor and draw the navel in toward the spine.
Step 3: Cactus your arms out and spread your fingers, allowing your pinky fingers to rotate inward. Hands can face each other, allowing shoulder blades to glide down your back.
Step 4: Lift through the heart centre and take the floating ribs in, lengthening through the spine.
Step 5: Take five deep breaths, allowing your exhalation to grow longer than the inhalation. Repeat several times adding variations that help you to open and feel grounded.
Bonus step: For extra power, come high on the balls of your feet and root down through both big toe mounds. Add some small pulses lifting and lowering your hips and start to feel the fire build in those glutes!

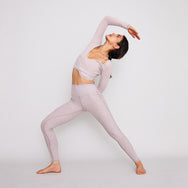
WARRIOR II
When you’re looking to strengthen your mindset, trying out the aptly-named Warrior II pose is the way to go. Tara Stiles, global yoga expert and author of Clean Mind, Clean Body: A 28 Day Plan for Physical, Mental and Spiritual Self-Care suggests this pose. If you’re ready to empower yourself and try something new, follow her expert steps here:
Step 1: Step your feet wide apart. Turn your right toes forward and your left toes in. Take a big inhale and reach your arms out to your sides. Exhale and sink your hips low.
Step 2: You shouldn't be leaning forward over your front leg or slouching back. Sink right in the middle like a bird gliding. True strength comes from your breath being your power source and your middle moving you.
Step 3: Notice any old habit of flexing your arms to feel strong or tensing your brow to feel mentally sharp. Let that go and all your breath to move your body. With this mindset and practice, you can stay here much longer and gain more strength.
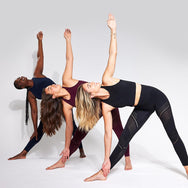
WARRIOR III
Aside from unleashing your power, the Warrior III Pose helps to strengthen your arms and legs, tones your abs, and improves your posture and balance. Mckeever recommends this advanced yoga power pose for those who want to unlock their inner strength. If you’re already familiar with common poses and want to give it a go, follow her expert steps:
Step 1: Stand in Mountain Pose, exhale and fold forward into Uttanasana. From Uttanasana, exhale and step your left foot back into a high lunge position. Your right knee should be more or less at a right angle. Lay the midline of your torso down on the midline of the right thigh and bring your hands to your right knee.
Step 2: Now from the lunge position, stretch your arms forward, parallel to the floor and parallel to each other, with palms facing each other. Exhale and press the head of the right thigh-bone back and press the heel actively into the floor. Synchronise the straightening of the front leg and the lifting of the back leg. As you lift the back leg, resist by pressing the tailbone into the pelvis.
Step 3: Don’t allow the torso to swing forward as you move into position. Instead, as you straighten the front knee, think of pressing the head of the thigh-bone back. This centres the femur in the hip joint, grounds the heel into the floor, and stabilises the position.
Step 4: The arms, torso, and raised leg should be positioned relatively parallel to the floor. Release the hip of the raised leg toward the floor until the two hip points are even and parallel to the floor.
Step 5: Energise the back leg and extend it strongly toward the wall behind you. Reach just as actively in the opposite direction with the arms. Bring the head up slightly and look forward, but be sure not to compress the back of your neck.

PLANK
Whether you’re working out at home or completing a yoga session, planking is a quick way to build both physical and mental strength. Anybody who has given it a go knows that holding the same position is tough, but it’s worth it when you get it right. The next time you want to try this staple move, follow these steps from Stiles:
Step1: Come onto all fours. Lean your centre towards one side so your opposite hand comes up on the ground.
Step 2: Lean your centre towards the other side so your other hand comes on the ground. Continue to shift your centre side to side to bring your legs and feet up.
Step 3: Soften your elbows and knees a bit so your power is coming from your middle, not your arms and legs.
Step 4: Allow yourself to shift a bit side to side and forward and back. With this moveability, you can stay here longer than if you are locking and flexing in the position.
CHAIR POSE
And finally, the Chair Pose is one of the easiest to get to grips with, and so it’s ideal for yoga newcomers. The position will help you embrace your inner calm and have a moment of sheer zen. You may also choose to use this pose as part of your winddown at the end of a session to bring it to a close. To get started, follow Stiles’ simple two-step tutorial:
Step 1: Start standing with your feet a bit apart. Take a big inhale and lift your arms up.
Step 2: Exhale and sink your hips low. Allow your breath to move your body upwards with your inhales and down with your exhales. Stay with this motion for ten long, deep breaths.
THE TAKEAWAY!
Time to grab your yoga mat and get practising. Now that you know some of the best yoga power poses, what are you waiting for? No matter how busy you are, you can include these positions in your daily routine. Take a few minutes and awaken your inner goddess!